Troubleshooting
If you run into any problems, please visit the node troubleshooting page for help. If you run into an error that isn’t yet listed, please reach out in our Discord!
The recent protocol upgrade now requires that the address of the prover and proposer are the same. This can be achieved by simply using the same private keys to run the proposer and prover software, but this is not recommended as it can cause nonce issues.
This guide outlines how to achieve this with separate EOAs running prover and proposer through the ProverSet smart contract.
Clone the Taiko Alethia monorepo
The Taiko Alethia monorepo contains the scripts for deploying your ProverSet. Checkout the latest stable release taiko-alethia-protocol-v2.3.0.
git clone https://github.com/taikoxyz/taiko-mono.gitcd taiko-mono/packages/protocolgit checkout tags/{release-tag}git clone https://github.com/taikoxyz/taiko-mono.gitcd taiko-mono/packages/protocol && git config core.autocrlf falsegit checkout tags/{release-tag}Deploy the ProverSet
Set PROVER_SET_ADMIN or ADMIN to the address of your prover EOA, OWNER to your proposer EOA. You will be able to withdraw TAIKO/TTKOh from the contract to this address.
Run the DeployProverSet.s.sol script with your proposer’s private key.
PRIVATE_KEY={PRIVATE_KEY} OWNER={OWNER_ADDRESS} ADMIN={ADMIN_ADDRESS} RESOLVER=0x5A982Fb1818c22744f5d7D36D0C4c9f61937b33a TAIKO_TOKEN=0x10dea67478c5F8C5E2D90e5E9B26dBe60c54d800 ENTRYPOINT=0x9F9D2fC7abe74C79f86F0D1212107692430eef72 INBOX=0x06a9Ab27c7e2255df1815E6CC0168d7755Feb19a forge script --evm-version cancun --chain-id 1 --rpc-url {YOUR_RPC_URL} --broadcast script/layer1/mainnet/DeployProverSet.s.sol:DeployProverSetThe script should print your implementation and proxy address with the log:
proxy : 0x..... impl : 0x..... owner : 0x..... chain id: 1Use proxy address for the following steps.
PRIVATE_KEY={PRIVATE_KEY} OWNER={OWNER_ADDRESS} ADMIN={ADMIN_ADDRESS} RESOLVER=0x3C82907B5895DB9713A0BB874379eF8A37aA2A68 TAIKO_TOKEN=0x6490E12d480549D333499236fF2Ba6676C296011 ENTRYPOINT=0x8698690dEeDB923fA0A674D3f65896B0031BF7c9 INBOX=0x79C9109b764609df928d16fC4a91e9081F7e87DB forge script --evm-version cancun --chain-id 17000 --rpc-url {YOUR_RPC_URL} --broadcast script/layer1/mainnet/DeployProverSet.s.sol:DeployProverSetThe script if run correctly will print the following logs:
== Logs == proxy : 0x..... impl : 0x..... owner : 0x..... chain id: 17000Use proxy address for the following steps.
Verify the contract as a proxy on Etherscan
Navigate to the proxyAddress logged as output of the script above in Etherscan.
In the Contract tab, you can find the More options section as follows:
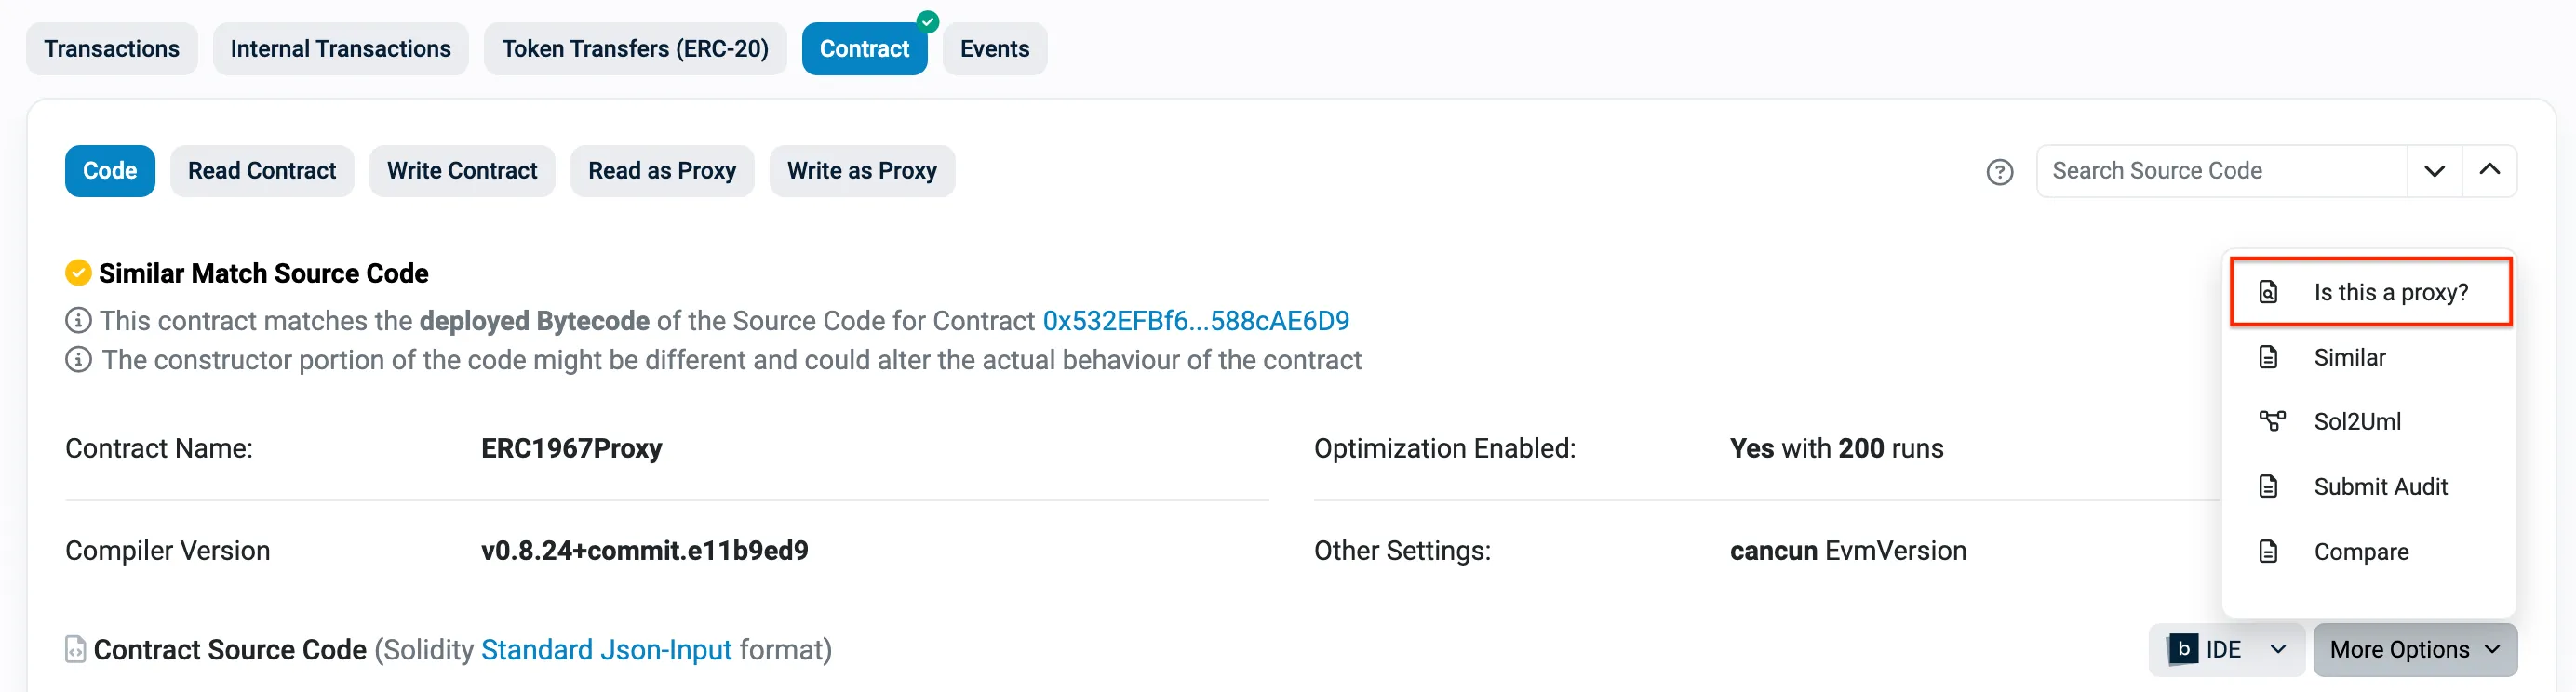
Select the Is this a proxy? option and follow the instructions. This should verify the contract as a proxy to your ProverSet implementation.
Write to the Proxy to enableProver()
If the above step was completed correctly, you should be able to see the Write as Proxy option in the Contract tab.
Connect to Etherscan with the prover EOA (that you set as ADMIN in the previous step) and send two enableProver() transactions, enabling both your proposer and prover EOAs as provers. Set isProver as true for both transactions. You can set these as false if you want to disable these provers in the future.
This will allow both EOAs to send transactions to your ProverSet implementation which will act as a proxy to TaikoInbox.
Configure the contract as necessary
Manage the contract’s allowance with approveAllowance(). TaikoInbox’s contract allowance is by default set to UINT256.MAX in the init function.
Deposit your tokens and run your proposer + prover as usual!
If you’ve followed the instructions, send your TAIKO/TTKOh to the ProverSet proxy and begin running your prover and proposer as usual. If you’ve set up your allowance properly, there should be no need to use the depositBond function, as it deposits TTKOh from the ProverSet to TaikoInbox.
Ensure that you have set up the EOAs correctly to avoid problems.
If you’ve already deployed a ProverSet but would like to upgrade it through the Proxy, this guide is for you!
Find your existing Proxy’s address
This will be necessary for the following step.
Navigate to the Taiko Alethia monorepo and checkout the release version of ProverSet you want to deploy.
cd taiko-mono/packages/protocolgit checkout tags/{PROTOCOL_RELEASE_TAG}Deploy the ProverSet contract from your proposer EOA and call upgradeTo with the new implementation address on your original Proxy
Check that the proxy contract’s owner is the proposer EOA. If it is not, you will have to call upgradeTo from the owner address.
Execute the following command, filling in the values in the curly braces appropriately.
forge create --private-key {YOUR_PRIVATE_KEY} --chain-id 1 --evm-version cancun --rpc-url {YOUR_RPC_URL} contracts/layer1/provers/ProverSet.sol:ProverSet --broadcast --constructor-args 0x5A982Fb1818c22744f5d7D36D0C4c9f61937b33a 0x06a9Ab27c7e2255df1815E6CC0168d7755Feb19a 0x10dea67478c5F8C5E2D90e5E9B26dBe60c54d800 0x9F9D2fC7abe74C79f86F0D1212107692430eef72forge create --private-key {YOUR_PRIVATE_KEY} --chain-id 17000 --evm-version cancun --rpc-url {YOUR_RPC_URL} contracts/layer1/provers/ProverSet.sol:ProverSet --broadcast --constructor-args 0x3C82907B5895DB9713A0BB874379eF8A37aA2A68 0x79C9109b764609df928d16fC4a91e9081F7e87DB 0x6490E12d480549D333499236fF2Ba6676C296011 0x8698690dEeDB923fA0A674D3f65896B0031BF7c9You should see logs like these:
Deployer: 0x3e5c...Deployed to: 0x9186...Transaction hash: 0xf0ebb...Then, proceed to your original Proxy contract; access the Write to Proxy tab and scroll to the upgradeTo() function.
Connect your EOA that you originally deployed the ProverSet from and call the function with your new Deployed to: address.
Once the transaction succeeds, you have successfully upgraded your ProverSet.
You can check your bond balance by calling the bondBalanceOf() function on the TaikoInbox proxy. This will return the amount of TTKOh/TAIKO you have debited as bond.
cast call --rpc-url {CHAIN_RPC_URL} --private-key <YOUR_PRIVATE_KEY> {TAIKO_INBOX_ADDRESS} "bondBalanceOf(address)" {YOUR_PROVERSET_ADDRESS}If you’ve managed to propose and prove some blocks, it’s likely you’re wondering where your tokens went after.
It’s not missing, it’s just been deposited as bond in the TaikoInbox contract; you can withdraw it to the ProverSet contract with withdrawBond() manually.
Once you’ve deployed the contract, you should be able to find the contract address. You can do this on Etherscan manually or with forge!
You will need foundry installed, and an Etherscan API key; you can get this by signing in on etherscan.io and navigating to your profile’s API Keys.
Then, navigate to the protocol package in taiko-mono and execute the following command substituting values in curly braces as necessary.
forge verify-contract --chain-id {CHAIN_ID} --etherscan-api-key {GET-API-KEY-FROM-ETHERSCAN-FIRST} {PUT-CONTRACT-ADDRESS-HERE} contracts/layer1/provers/ProverSet.sol:ProverSetYou should get a success message and your contract should now show up as verified on Etherscan!
Troubleshooting
If you run into any problems, please visit the node troubleshooting page for help. If you run into an error that isn’t yet listed, please reach out in our Discord!